Frequently asked questions
Technical answers for integrating, configuring, and customizing Synap Editor — from toolbar setup and real-time collaboration to image uploads and licensing.
33 questions shown
No results found. Try a different keyword.
Description
synapeditor.config.js.By default, the
customList style is applied to the Bullet feature.How to Apply
synapeditor.config.js:'editor.toolbar': [
'new', 'open', 'template', 'layout', '|',
'contentsProperties', '|',
'undo', 'redo', '|',
'copy', 'cut', 'paste', '|',
'link', 'unlink', 'bookmark', '|',
'image', 'background', 'video', 'file', '|',
'table', 'div', 'horizontalLine', 'quote', '|',
'specialCharacter', 'emoji', '-',
'paragraphStyleWithText', '|',
'fontFamilyWithText', '|',
'fontSizeWithText', '|',
'bold', 'italic', 'underline', 'strike', '|',
'growFont', 'shrinkFont', '|',
'fontColor', 'fontBackgroundColor', '|',
'bulletList', 'numberedList', 'multiLevelList', '|',
'align', '|',
'lineHeight', '|',
'decreaseIndent', 'increaseIndent','customList'
],
'editor.list.customList': [
{
format: 'bullet',
levelText: '▎',
runStyle: {
color: { r: 0, g: 102, b: 204 },
fontSize: { value: 10, unit: 'pt' },
display: 'inline-block',
width: { value: 4, unit: 'px' },
marginLeft: { value: 0, unit: 'px' },
marginRight: { value: 1, unit: 'px' },
paddingLeft: { value: 0, unit: 'px' },
textIndent: { value: 0, unit: 'px' }
}
},
{
format: 'bullet',
levelText: '-',
runStyle: {
color: { r: 30, g: 30, b: 30 },
fontSize: { value: 9, unit: 'pt' },
display: 'inline-block',
width: { value: 6, unit: 'px' },
marginRight: { value: 2, unit: 'px' },
paddingLeft: { value: 0, unit: 'px' },
textIndent: { value: 0, unit: 'px' }
}
},
{
format: 'bullet',
levelText: '·',
runStyle: {
color: { r: 30, g: 30, b: 30 },
fontSize: { value: 9, unit: 'pt' },
display: 'inline-block',
width: { value: 6, unit: 'px' },
marginRight: { value: 2, unit: 'px' },
paddingLeft: { value: 0, unit: 'px' },
textIndent: { value: 0, unit: 'px' }
}
}
]How to Apply
Level 2: -
Level 3: ·
styles are applied as a multi-level custom list.
- Colors, spacing, and sizes can be freely adjusted in
runStyle.
Notes
- This configuration applies globally to all editor instances.
- Compatible with the built-in Bullet feature.
- Additional adjustments may be needed depending on your environment.
However, you can enable it by calling the
toggleRuler command in the editor's initialized event.How to Apply
initialized in the editor.execCommand('toggleRuler') event willautomatically enable the ruler when the editor is created.
|
Description
The equation/chemical formula editor plugin uses MathType, a commercial module.
The example below shows how to integrate the Java version of MathType with Synap Editor.
For npm-based integration, refer to the equation editor usage guide.
To purchase a commercial MathType license, contact the MathType team:
Equation editor guide: /documents/en/plugins/formula-editor
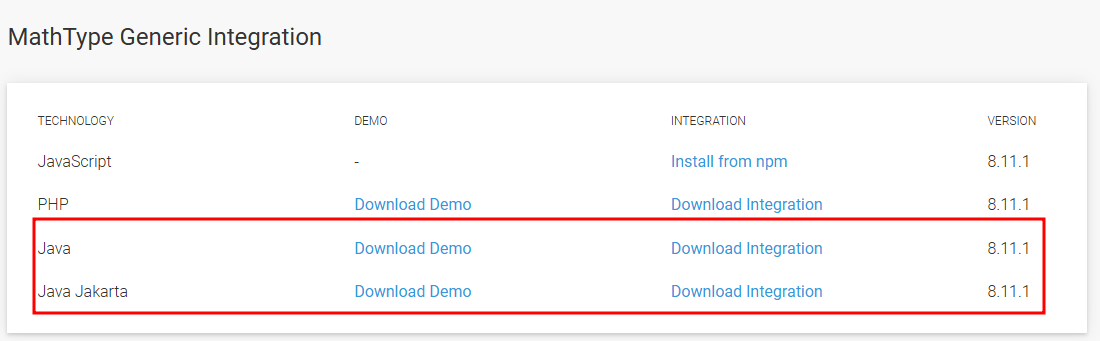
1. Download Java MathType for generic HTML editors (MathType Generic Integration)
Download the plugin matching your JDK version.
JDK Compatibility
Java: up to JDK 11 (including 1.8)
Java Jakarta : JDK 11 ~
Folder Structure
After extraction, the package contains pluginwiris_engine.war (the MathType engine for deployment) and a generic_wiris folder with JS files for editor integration.
2. Deploy pluginwiris_engine.war
Deploy to WAS
Deploy pluginwiris_engine.war to your WAS server (JBoss, Tomcat, etc.).
Verify Deployment
After deployment, confirm that the following URL is accessible:
ip:port/pluginwiris_engine/app/configurationjs
e.g.) http://localhost:7070/pluginwiris_engine/app/configurationjs
Example (success)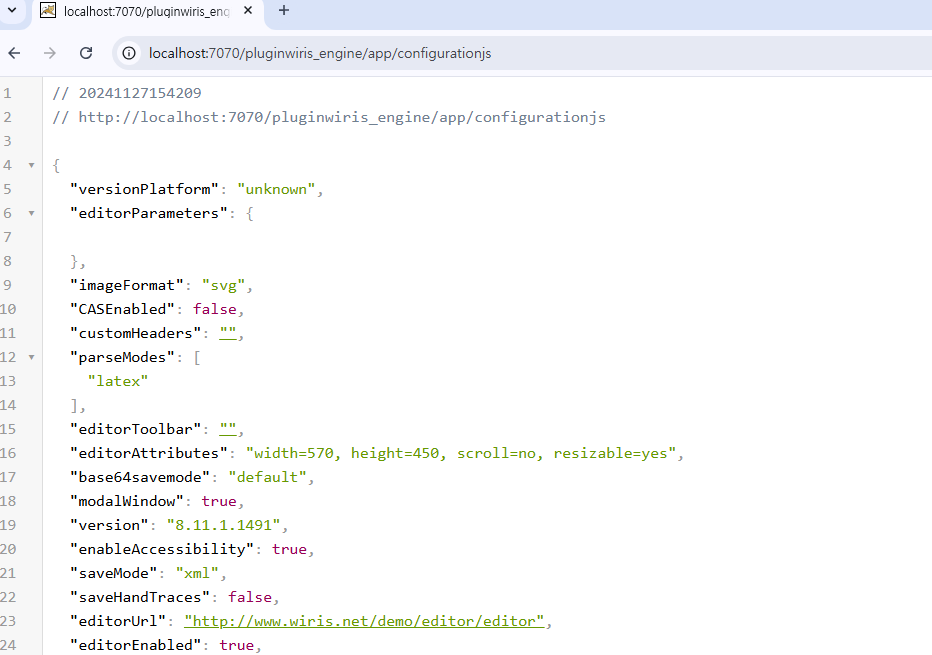
3. Integrate with the Editor
3.1 Load Plugin Files
java MathType generic_wiris wirisplugin-generic.js include .
|
3.2 Add Toolbar Buttons
Add the equation/chemical formula buttons to the toolbar in synapeditor.config.js.

|
3.3 Configure MathType
Add MathType configuration at the bottom of synapeditor.config.js.
|
Description
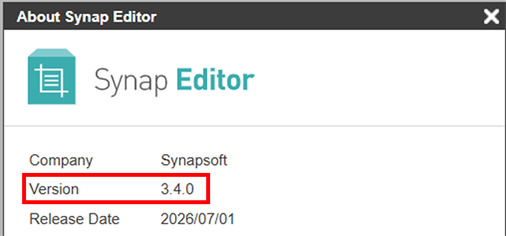
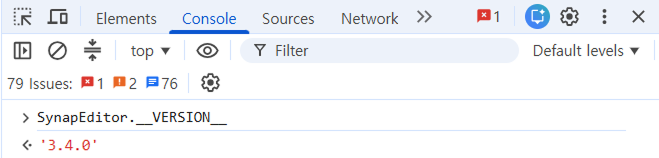
Here are the ways to check the Synap Editor version.
1. Via the menu: Help → About Synap Editor

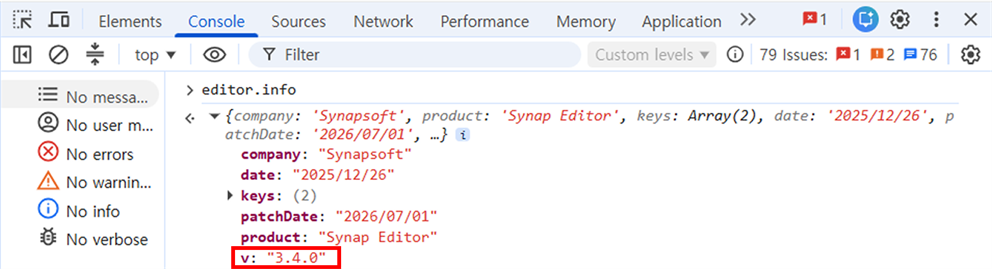
2. Using editor.info in the browser console
Open Developer Tools (F12) → Console tab and enter the command below.
editor.info
3. Using SynapEditor.__VERSION__
Open Developer Tools (F12) → Console tab and enter the command below.
SynapEditor.__VERSION__
Description
Here are the ways to remove the toolbar or menu.
1. Comment out or remove property values
Toolbar
Leave the toolbar property key in place, but comment out the values to hide it.
Set the menu visibility to false.
Note: Commenting out the property key entirely resets the toolbar to its default.
synapeditor.config.js
|
Toolbar settings : /documents/en/installation-and-configuration/configuration/basic-ui-settings/toolbar-settings
Menu settings : /documents/en/installation-and-configuration/configuration/basic-ui-settings/menu-settings
2. Use inline mode
Switch the editor type to inline mode to use it without a toolbar or menu.
|
Inline editor result:
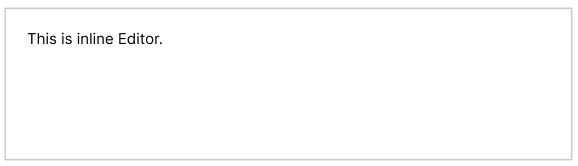
Inline mode demo : https://synapeditor.com/docs/display/SEDEMO/Inline+Editor
Description
You can add frequently used special characters or emoji
 to the toolbar or Quick Insert menu
 through a custom plugin.
Custom plugin guide : /documents/en/plugins/custom-plugin
Creating the Custom Plugin
BoxDrawingLeft.js
|
Loading the Plugin Files
|
Register in synapeditor.config.js
synapeditor.config.js Toolbar.
Toolbar setting
|
Quick Insert setting
|
Demo
Description
Assign keyboard shortcuts to frequently used functions. View the default shortcut list with Ctrl+/ (Windows) or Cmd+/ (Mac).
If a new shortcut conflicts with an existing one, the new shortcut takes priority.
Shortcuts are configured via a custom plugin.
Custom plugin guide : /documents/en/plugins/custom-plugin
Default Shortcut Setup
Define separate shortcuts for Windows and Mac/Linux environments.
|
See the guide for the full list of supported keys.
Option Settings
action : the Action to execute (see: Actions)
params : parameters passed to the action.
onExecute : release 3.3.0 and later
focusItem : whether to focus the target after execution (default: true)
|
Example: Shortcuts for Form Elements
An example of assigning shortcuts to frequently used form elements.
Form element editor plugin guide : /documents/en/plugins/form-editor
1. Load the Form Element Editor Plugin
Load the form element editor plugin files in your HTML.
|
2. Assign Shortcuts via Custom Plugin
Available action list : /documents/en/plugins/form-editor(see Actions)
Example: shortcuts for radio button and text field.
|
Load the custom shortcut plugin file (e.g., shortcut.js):
|
3. Test the Shortcuts
Description
Example configuration for active-passive HA failover using two web servers and a proxy, to ensure real-time collaboration continuity.
This example uses the active-passive approach.
※ Active-passive mode: One server handles all traffic as the primary. The secondary stays on standby and takes over only if the primary fails.
Test Environment
linux - rocky 9.4
HAProxy
node(v20.16.0) - PM2
Configuration & Code
1. synapeditor.config.js
|
HTML setup
Sample HTML file: see the attached collabo.html
2. Install and Configure HAProxy
Install HAProxy
|
Edit the HAProxy config file (/etc/haproxy/haproxy.cfg)
|
Start the service
|
Check the service status
|
3. Start PM2 WebSocket Server
Node.js must be installed.
Real-time collaboration WebSocket server setup guide : https://synapeditor.com/docs/pages/viewpage.action?pageId=58950249
Install PM2
|
Start WebSocket Servers
|
Verify WebSocket Status
|
Monitor WebSocket Servers
|
Description
When performing calculations in a table, JavaScript's floating-point arithmetic may produce unintended digits
(e.g., 0.30000000000000004). This guide shows how to fix it.
Change the cell display format to decimal to eliminate floating-point precision issues.
※ Cell decimal format is supported from editor release 3.3.0 and later.
Code
Change cell display format from plain text to decimal on table creation (applied to all tables):
function SynapEditorAfterEdit(e) {
    let tableId;
    if(e.actionName =="insertTable") {
        console.log(e)
        tableId = e.targetIds
        const table = document.querySelector(`table[data-paragraph-id="${tableId}"]`);
        if (table) {
            // Select all td elements
            const tdElements = table.querySelectorAll('td');
            // Add attributes to each td
            tdElements.forEach(td => {
                td.setAttribute('data-number-format-code', '#,##0.00');
                td.setAttribute('data-number-format-id', '4');
            });
            editor.updateBodyModel();
        }
    }
}
To change cell format manually after table creation:
Table Cell Properties → Display Format → Decimal

Description
How to add a specific CSS class to a table in the editor.
Adds the class to the table where the caret is currently positioned.
Code
Case 1: iframe mode = false
let tableid;
if(editor.getSelection().start.getType() == 'cell') {
    tableid = editor.getSelection().start.tableId;
} else {
    const pEl = editor.getSelection().start.id;
    const findid = document.getElementById(pEl);
    tableid = findid.closest('table').id;
}
if (tableid) {
    const tableElement = document.getElementById(tableid);
    tableElement.classList.add('table1'); // Specify the class name to add
}
editor.updateBodyModel();
Case 2: iframe mode = true
// Select the iframe element
const iframe = document.querySelector('iframe.se-contents-edit');
// Verify the iframe was selected correctly
if (!iframe) {
    console.error('Cannot find the iframe element.');
} else {
    // Access the iframe document
    const iframeDocument = iframe.contentDocument || iframe.contentWindow.document;
    let tableid;
    if (editor.getSelection().start.getType() == 'cell') {
        tableid = editor.getSelection().start.tableId;
    } else {
        const pEl = editor.getSelection().start.id;
        const findid = iframeDocument.getElementById(pEl); // Find the element inside the iframe
        tableid = findid.closest('table').id;
    }
    if (tableid) {
        const tableElement = iframeDocument.getElementById(tableid); // Find the table inside the iframe
        tableElement.classList.add('table1'); // Specify the class name to add
    }
}
editor.updateBodyModel();
Case 3: Check iframe existence with if statement
// Select the iframe element
const iframe = document.querySelector('iframe.se-contents-edit');
let tableid;
let documentToUse = document;
if (iframe) {
    // If iframe exists, access it
    const iframeDocument = iframe.contentDocument || iframe.contentWindow.document;
    if (!iframeDocument) {
        console.error('Cannot access the iframe document.');
    }
    documentToUse = iframeDocument;
}
// When no iframe element exists
if (editor.getSelection().start.getType() == 'cell') {
    tableid = editor.getSelection().start.tableId;
} else {
    const pEl = editor.getSelection().start.id;
    const findid = documentToUse.getElementById(pEl);
    if (!findid) {
        console.error('Cannot find the selected element.');
    }
    tableid = findid.closest('table').id;
}
if (tableid) {
    const tableElement = documentToUse.getElementById(tableid);
    tableElement.classList.add('table1'); // Specify the class name to add
}
editor.updateBodyModel();
Reference API : /documents/api/synapeditor?version=latest#getselection
Example
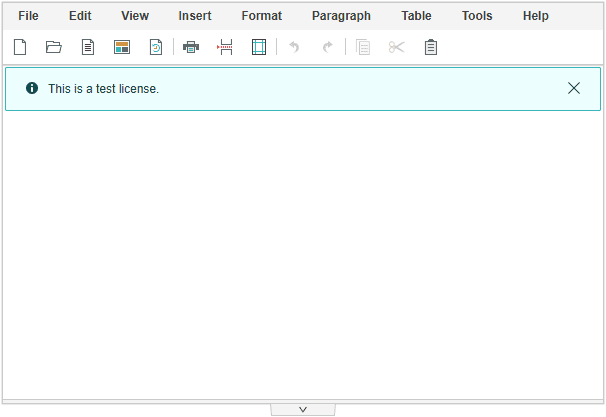
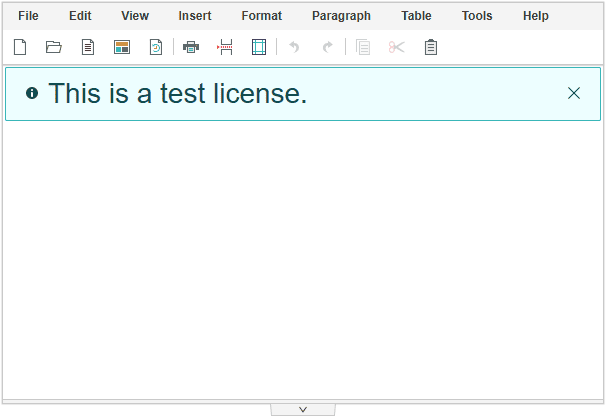
Changing the Font Size
Apply font-size and line-height styles to .se-notification-text.
.se .se-notification-text {
    font-size: 28px !important;
    line-height: 28px !important; /* Set to the same value as font-size */
}
Before | After |
|---|---|
|
|
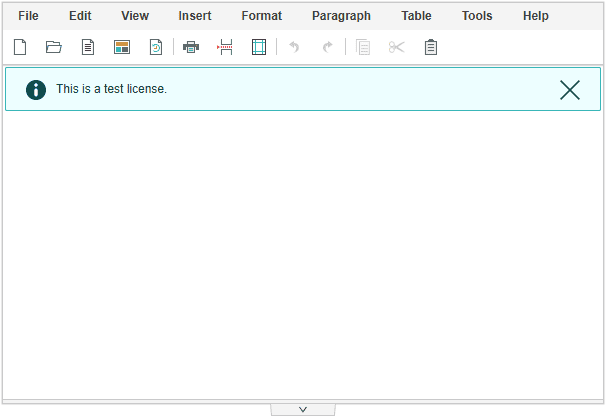
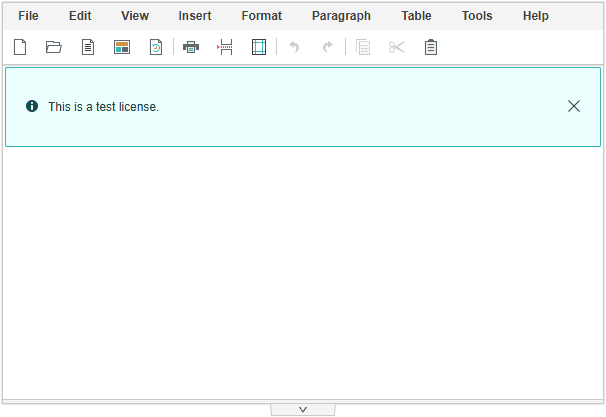
Changing the Icon Size
Change the width and height of .se-notification-icon (leading icon) and .se-notification-close (close button).
Also update the width of .se-notification-text accordingly.
.se .se-notification-icon, .se .se-notification-close {
    width: 20px !important;
    height: 20px !important;
}
.se .se-notification-text {
    /* calc 100% :
       20px: width
       20px: width
       25px:
    */
    width: calc(100% - (20px + 20px + 25px)) !important;
}
Before | After |
|---|---|
|
|
Making the Notification Taller
Apply padding-top and padding-bottom to .se-notification-layer.
.se .se-notification-layer {
    padding-top: 30px !important;
    padding-bottom: 30px !important;
}
Before | After |
|---|---|
|
|
If your site uses HTTPS, SSL configuration is required to enable real-time collaboration.
The example below shows a proxy configuration for Apache as the web server.
It is assumed the collaboration server is listening on port 11000.
httpd.conf — Enable Proxy Modules
LoadModule proxy_module modules/mod_proxy.so
LoadModule proxy_http_module modules/mod_proxy_http.so
LoadModule proxy_wstunnel_module modules/mod_proxy_wstunnel.so
conf.d/ssl.conf
Listen 12000 httpsCreate and configure a virtual host file (e.g., collabo.synapsoft.com.conf):
Define DOMAIN synapsoft.co.kr
<VirtualHost *:12000>
    ServerName collabo.synapsoft.com
    ErrorLog logs/ssl_error_log
    TransferLog logs/ssl_access_log
    LogLevel warn
    SSLEngine on
    SSLProtocol all -SSLv2 -SSLv3
    SSLCipherSuite HIGH:3DES:!aNULL:!MD5:!SEED:!IDEA
    SSLCertificateFile /etc/httpd/ssl/cert.pem
    SSLCertificateKeyFile /etc/httpd/ssl/rsakey.pem
    SSLCertificateChainFile /etc/httpd/ssl/DigiCertCA.pem
    <Files ~ "\.(cgi|shtml|phtml|php3?)$">
        SSLOptions +StdEnvVars
    </Files>
    ProxyPreserveHost On
    ProxyPass / ws://192.168.23.82:11000/
    ProxyPassReverse / ws://192.168.23.82:11000/
    <Proxy *>
        Require all granted
    </Proxy>
    BrowserMatch "MSIE [2-5]" \
         nokeepalive ssl-unclean-shutdown \
         downgrade-1.0 force-response-1.0
    CustomLog logs/ssl_request_log \
          "%t %h %{SSL_PROTOCOL}x %{SSL_CIPHER}x \"%r\" %b"
</VirtualHost>Example of adding a class to an <a> tag inserted via the editor.
This is useful when the class needs to be referenced elsewhere in your application.
Sample Code
function SynapEditorAfterEdit(e) {
    if(e.actionName=="insertLink"){
        var pTag = document.getElementById(e.targetIds[0]);
        var anchorTag = pTag.getElementsByTagName('a')[0];
        anchorTag.classList.add('new-class');
        editor.updateModel(e.targetIds[0]);   // dom model update
    }
}
APIs Used
SynapEditorAfterEdit: https://synapeditor.com/documents/en/api/events/afterEdit
updateModel: https://synapeditor.com/documents/en/api/editor-object/updateModel
Regular users may find it difficult to apply partial edit restrictions directly through the View Source feature.
Instead, you can implement a button that triggers the restriction programmatically.
The demo below shows how to apply partial edit restrictions using the developer console.
Sample Code
var td = editor.getTableCellHTMLElement();
editor.setLock('#'+td.id);
APIs Used
Sometimes you need to add a class to a table after it has been inserted.
Here is one approach.
Sample Code
function SynapEditorAfterEdit(e) {
    if(e.actionName === 'insertTable'){   // Description
        var obj = editor.getAPIModels()[0];// Get the paragraph ID of the inserted element
        var pid = obj.id;
        var table = editor.getAPIModelsBySelector('table[data-paragraph-id="'+pid+'"')[0];   // Find the table by paragraph ID
        table.addClass('your-class-name');// Add class to the table
    }
}
APIs Used
SynapEditorAfterEdit: https://synapeditor.com/documents/en/api/events/afterEdit
getAPIModels: https://synapeditor.com/documents/en/api/editor-object/getAPIModels
getAPIModelsBySelector: https://synapeditor.com/documents/en/api/editor-object/getAPIModelsBySelector
addClass: https://synapeditor.com/documents/en/api/api-model/Element#Element-addClass
If the Import feature in Synap Editor is not working correctly, you can test it from the command line.
For errors not listed below, please contact Synapsoft technical support.
Email: support@synapsoft.co.kr
Phone: 02-2039-3782
shell> /home/synap/sedocConverter_exe -f [font directory] [source file path] [output directory] [temp directory]

ex)
shell> /home/synap/sedocConverter_exe -f /home/test/fonts /home/synap/test.hwp /home/synap/result /home/sgacorp/temp
Return Code | Description |
|---|---|
0 | Success |
2 | Unsupported format |
3 | Encrypted document (not supported) |
4 | Target path too long |
161 | Conversion failed |
252 | Invalid license key |
253 | CPU count limit exceeded |
254 | License expired |
255 | Unexpected error |
Web fonts can be configured as follows.
1. Add the font stylesheet to your HTML:
<link rel="stylesheet" href="https://fonts.googleapis.com/css?family=YourFontName">2. Add the font name to synapeditor.config.js:
/**
 * Defines the font families available for editing.
 */
'editor.fontFamily': {
    'ko': [
        'Arial', 'Comic Sans MS', 'Courier New', 'Georgia',
        'Lucida Sans Unicode', 'Tahoma', 'Times New Roman', 'Trebuchet MS', 'Verdana', 'your-web-font-name'
    ],
}When integrating Occasionally, Add or modify the following code in the source view may overflow the editor container as shown below.
There are two ways to fix this.
Option 1) html Add or modify the following code in css
.se-code-viewer { overflow: auto; }Option 2) CodeMirror
Manual: : https://synapeditor.com/documents/en/external-modules/code-mirror
After applying the fix:

Synap Editor supports hiding the toolbar and menu bar and then switching to preview mode.
Set display:none on the toolbar and menu bar:
|
Then switch to preview mode using the setMode API:
|
Demo
APIs Used
By default, pressing Tab moves focus through the menu items.
If you want Tab to jump directly to the editor body, use the focusIme command.
Synap Editor provides a focusIme API for this.
Manual:https://synapeditor.com/docs/display/SE/command+-+focusIme
// Move focus to the editor body
editor.execCommand('focusIme', false);
// Move focus and scroll to the editor body
editor.execCommand('focusIme', true);
To automatically move focus to the body on first Tab press, add:
document.querySelector('.se .se-toolbar button.se-clickable').addEventListener('focus', () => {
  editor.execCommand('focusIme');
}, {once: true})Synap Editor does not have a built-in placeholder feature. However, you can achieve the same effect by adding custom code as shown in the sample guide below.
synapeditor.config.js
// Define the placeholder CSS
.se.editorPlaceHolder .se-contents > p:after {
  content: 'Enter your content here.' !important;
  color: #999 !important;
}
// https://synapeditor.com/docs/display/SE/afterEdit
editor.setEventListener('afterEdit', function(e) {
  if (editor.isEmpty()) {
    editor.getElement().addClass('editorPlaceHolder');
  } else {
    editor.getElement().removeClass('editorPlaceHolder');
  }
})
If you need a line break within the placeholder text:
.se.editorPlaceHolder .se-contents > p:after {
  content: 'Enter your\A content here.' !important;
  color: #999 !important;
  white-space: pre !important;
}Synap Editor supports UTF-8 encoding. If your server uses EUC-KR, you must explicitly specify the character set.
Web servers typically declare the character set using a meta charset tag:
<html>
  <head>
    <meta charset="UTF-8">
  </head>
</html>
When loading the editor scripts, also add the charset="UTF-8" attribute to the <script> tags:
<!DOCTYPE html>
<html lang="en">
<head>
  <meta charset="utf-8">
  <meta http-equiv="X-UA-Compatible" content="IE=edge">
  <meta name="viewport" content="width=device-width, initial-scale=1.0, minimum-scale=1.0,
        maximum-scale=1.0, user-scalable=no, shrink-to-fit=no">
  <title>Synap Editor</title>
  <link href="/js/SynapEditor/synapeditor.min.css" rel="stylesheet" type="text/css">
  <script src="/js/SynapEditor/synapeditor.config.js" charset="UTF-8"></script>
  <script src="/js/SynapEditor/synapeditor.min.js" charset="UTF-8"></script>
  <script>
    function initEditor() {
      new SynapEditor('SynapEditor1', synapEditorConfig);
    }
  </script>
</head>
<body onload="initEditor();">
  <div id="SynapEditor1"></div>
</body>
</html>Synap Editor lets you configure default styles for the editing area, including font name, font size, line height, paragraph spacing, and more.
To set the default paragraph size, configure the Paragraph element under editor.defaultStyle.
synapeditor.config.js
/**
 * Defines the default styles used in the editor.
 * Only the elements listed below are configurable; values are written as cssText strings.
 * Supported elements:
 *   'Body', 'Paragraph', 'TextRun', 'Div', 'Image', 'Video', 'List', 'ListItem',
 *   'Quote', 'Table', 'TableRow', 'TableCell', 'HorizontalLine', 'Iframe',
 *   'Heading1', 'Heading2', 'Heading3', 'Heading4', 'Heading5', 'Heading6'
 */
'editor.defaultStyle': {
  'Body': 'font-family: Arial; font-size: 11pt; line-height: 1.2;'
},Synap Editor provides a feature to restrict editing within specific regions.
Manual: https://synapeditor.com/docs/display/SE/setLock
When the lock feature is active, a lock/unlock icon appears in the editor. You can hide it by applying the following CSS:
.se:not(#se-t).se-edit-mode .se-main .se-contents-edit .se-contents .se-lock:after,
.se:not(#se-t).se-edit-mode .se-main .se-contents-edit .se-contents .se-unlock:after {
  content: '';
}
Note: When using iframe mode, the CSS must be applied inside the iframe.
Step 1. Enable event attribute insertion
synapeditor.config.js
// Allow event attributes such as onclick, onload, onchange, etc.
'editor.contentFilter.allowEventAttribute': true
Step 2. Add the attribute to an element
// Insert an img element into the editor
var html = "<img id='sample' src='https://synapeditor.com/wp-content/uploads/2019/08/newvalue_01.png' style='width:50px; height:50px;'>";
editor.insertHTML(html);
// Retrieve the image model
var image = editor.getAPIModelById('sample');
// Add the desired event attribute
image.setAttribute('onerror', 'http://sample.co.kr');
// REQUIRED: sync the editor model
editor.updateModel('sample');In addition to generating HTML, Synap Editor provides an API to extract the content as plain text.
getTextContent API — extracts the editor content as a plain-text string.
API manual: https://synapeditor.com/docs/display/SE/getTextContent
Note: Text produced by getTextContent does not include line breaks.
XSS (Cross-Site Scripting) is an attack in which malicious scripts are injected into web content — such as a bulletin board post — by someone other than an authorized administrator.
Synap Editor includes built-in content filtering to prevent scripts from being embedded in post content. Use the following settings in your configuration file:
synapeditor.config.js
/**
 * Controls filtering of <iframe> tags.
 */
'editor.contentFilter.allowIframe': false,
/**
 * Controls filtering of <script> tags.
 */
'editor.contentFilter.allowScript': false,
/**
 * Controls filtering of event attributes on HTML tags (e.g., onclick).
 */
'editor.contentFilter.allowEventAttribute': false,
/**
 * Controls filtering of <link> tags.
 */
'editor.contentFilter.allowLink': false,
Set any of these properties to false (or omit them) to block the corresponding content type. Setting them to true allows the content to pass through the filter.
There are two common causes to investigate:
1. Domain has changed
Synap Editor licenses are domain-specific. If your domain has changed, you will need to request a new license.
2. Error after replacing the license file
If you upgrade to the latest version but continue using an older license file, an error will occur. (The old license file includes an update expiration date that no longer matches the new version.)
To resolve this, use the license.json file bundled with the latest version of the editor.
When an image is uploaded, Synap Editor preserves its original DPI. However, if the image is wider than the editor container, it will be scaled down to fit.
To render images at their true original dimensions regardless of the editor width, use the afterUploadImage event listener and clear the width and height constraints:
editor.setEventListener('afterUploadImage', function(e) {
  setTimeout(function() {
    var img = editor.getAPIModelById(e.elementId);
    img.setWidth(null);
    img.setHeight(null);
  }, 0);
})Follow the steps below to set up the Import feature.
Step 1. Set the API endpoint in synapeditor.config.js
{
  'editor.import.api': '/importDoc.do',
}
Step 2. Configure allowed file extensions in synapeditor.config.js
{
  'editor.import.extensions': ['docx', 'doc', 'hwp', 'hml', 'html', 'htm', 'txt', 'xls', 'xlsx', 'pptx', 'ppt', 'odt'],
}
Step 3. Add the server-side handler (Java Spring Framework example)
import org.springframework.stereotype.Controller;
import org.springframework.web.bind.annotation.*;
import org.springframework.web.multipart.MultipartFile;
import javax.servlet.http.HttpServletRequest;
import java.io.*;
import java.util.*;
import java.util.zip.InflaterInputStream;
@Controller
public class ImportController {
  static String DOC_UPLOAD_DIR_REL_PATH = "uploads" + File.separator + "docs";
  static String OUTPUT_DIR_REL_PATH = "uploads" + File.separator + "output";
  @RequestMapping(value = "/importDoc.do", method = RequestMethod.POST)
  @ResponseBody
  public Map<String, Object> importDoc(HttpServletRequest request,
      @RequestParam("file") MultipartFile importFile) throws IOException {
    String ROOT_ABS_PATH = request.getSession().getServletContext().getRealPath("");
    String UPLOAD_DIR_ABS_PATH = ROOT_ABS_PATH + File.separator + DOC_UPLOAD_DIR_REL_PATH;
    makeDirectory(UPLOAD_DIR_ABS_PATH);
    String fileName = importFile.getOriginalFilename();
    String inputFileAbsPath = UPLOAD_DIR_ABS_PATH + File.separator + fileName;
    writeFile(inputFileAbsPath, importFile.getBytes());
    // Create a unique output directory for each file
    Calendar cal = Calendar.getInstance();
    String yearMonth = String.format("%04d%02d", cal.get(Calendar.YEAR), cal.get(Calendar.MONTH) + 1);
    String uuid = UUID.randomUUID().toString();
    String worksDirAbsPath = ROOT_ABS_PATH + File.separator + OUTPUT_DIR_REL_PATH
        + File.separator + yearMonth + File.separator + uuid;
    makeDirectory(worksDirAbsPath);
    // Run the document converter
    executeConverter(inputFileAbsPath, worksDirAbsPath);
    // Delete the original upload after conversion
    deleteFile(inputFileAbsPath);
    // Read and serialize the converted .pb file
    // Note: Since v2.3.0, the filename changed from document.word.pb to document.pb
    String pbAbsPath = worksDirAbsPath + File.separator + "document.pb";
    Integer[] serializedData = serializePbData(pbAbsPath);
    // Delete the .pb file
    deleteFile(pbAbsPath);
    Map<String, Object> map = new HashMap<String, Object>();
    map.put("serializedData", serializedData);
    // Return a browser-accessible path via importPath.
    // Adjust to match your OUTPUT_DIR_REL_PATH.
    map.put("importPath", "uploads/output/" + yearMonth + "/" + uuid);
    return map;
  }
  public static int executeConverter(String inputFilePath, String outputFilePath) {
    String SEDOC_CONVERTER_DIR_ABS_PATH = "/path/to/converter/directory";
    String FONT_DIR_ABS_PATH = SEDOC_CONVERTER_DIR_ABS_PATH + File.separator + "fonts";
    String TEMP_DIR_ABS_PATH = SEDOC_CONVERTER_DIR_ABS_PATH + File.separator + "temp";
    String SEDOC_CONVERTER_ABS_PATH = SEDOC_CONVERTER_DIR_ABS_PATH + File.separator + "sedocConverter_exe";
    // For Windows: use "sedocConverter.exe" instead
    makeDirectory(TEMP_DIR_ABS_PATH);
    makeDirectory(FONT_DIR_ABS_PATH);
    String[] cmd = { SEDOC_CONVERTER_ABS_PATH, "-f", FONT_DIR_ABS_PATH,
        inputFilePath, outputFilePath, TEMP_DIR_ABS_PATH };
    try {
      Timer t = new Timer();
      Process proc = Runtime.getRuntime().exec(cmd);
      TimerTask killer = new TimeoutProcessKiller(proc);
      t.schedule(killer, 20000); // Kill if conversion exceeds 20 seconds
      int exitValue = proc.waitFor();
      killer.cancel();
      return exitValue;
    } catch (Exception e) {
      e.printStackTrace();
      return -1;
    }
  }
  // ... (serializePbData, writeFile, deleteFile, makeDirectory, TimeoutProcessKiller helpers)
}You can assign different settings to each editor instance by deep-copying the shared configuration object and modifying each copy before initialization.
First, make sure you are familiar with the editor initialization process:
https://synapeditor.com/docs/pages/viewpage.action?pageId=8421764
Example: Dynamically applying different configs at initialization
<!DOCTYPE html>
<html lang="en">
<head>
  <meta charset="utf-8">
  <meta http-equiv="X-UA-Compatible" content="IE=edge">
  <meta name="viewport" content="width=device-width, initial-scale=1.0, minimum-scale=1.0,
        maximum-scale=1.0, user-scalable=no, shrink-to-fit=no">
  <title>Synap Editor</title>
  <link href="/js/SynapEditor/synapeditor.min.css" rel="stylesheet" type="text/css">
  <script src="/js/SynapEditor/synapeditor.config.js"></script>
  <script src="/js/SynapEditor/synapeditor.min.js"></script>
  <script>
    function initEditor() {
      // Deep-copy the shared config for each instance to avoid cross-contamination
      var config1 = JSON.parse(JSON.stringify(synapEditorConfig));
      var config2 = JSON.parse(JSON.stringify(synapEditorConfig));
      var config3 = JSON.parse(JSON.stringify(synapEditorConfig));
      config1['editor.size.height'] = '300px';
      config2['editor.size.height'] = '500px';
      config3['editor.size.height'] = '700px';
      new SynapEditor('SynapEditor1', config1);
      new SynapEditor('SynapEditor2', config2);
      new SynapEditor('SynapEditor3', config3);
    }
  </script>
</head>
<body onload="initEditor();">
  <div id="SynapEditor1"></div>
  <div id="SynapEditor2"></div>
  <div id="SynapEditor3"></div>
</body>
</html>Follow the steps below to enable server-side image uploads.
Step 1. Set the API endpoint in synapeditor.config.js
{
  'editor.upload.image.api': '/uploadImage.do',
}
Step 2. Configure allowed file extensions in synapeditor.config.js
{
  'editor.upload.image.extensions': ['jpg', 'gif', 'png', 'jpeg'],
}
Step 3. Add the server-side handler (Java Spring Framework example)
import org.springframework.stereotype.Controller;
import org.springframework.web.bind.annotation.*;
import org.springframework.web.multipart.MultipartFile;
import javax.servlet.http.HttpServletRequest;
import java.io.*;
import java.util.*;
@Controller
public class UploadController {
  static String IMAGE_UPLOAD_DIR_REL_PATH = "uploads";
  @RequestMapping(value = "/uploadImage.do", method = RequestMethod.POST)
  @ResponseBody
  public Map<String, Object> uploadFile(HttpServletRequest request,
      @RequestParam("file") MultipartFile file) throws IOException {
    String ROOT_ABS_PATH = request.getSession().getServletContext().getRealPath("");
    String UPLOAD_DIR_ABS_PATH = ROOT_ABS_PATH + File.separator + IMAGE_UPLOAD_DIR_REL_PATH;
    makeDirectory(UPLOAD_DIR_ABS_PATH);
    String fileName = file.getOriginalFilename();
    String ext = "";
    String contentType = file.getContentType();
    if (contentType != null) {
      ext = "." + contentType.substring(contentType.lastIndexOf('/') + 1);
    } else if (fileName.lastIndexOf('.') > 0) {
      ext = fileName.substring(fileName.lastIndexOf('.'));
    }
    // Normalize .jpeg to .jpg
    if (ext.indexOf(".jpeg") > -1) {
      ext = ".jpg";
    }
    String saveFileName = UUID.randomUUID().toString() + ext;
    String saveFileAbsPath = UPLOAD_DIR_ABS_PATH + File.separator + saveFileName;
    writeFile(saveFileAbsPath, file.getBytes());
    Map<String, Object> map = new HashMap<String, Object>();
    // Return a browser-accessible path in uploadPath
    map.put("uploadPath", "uploads/" + saveFileName);
    return map;
  }
  private static void writeFile(String path, byte[] bytes) throws IOException {
    OutputStream os = null;
    try {
      os = new FileOutputStream(path);
      os.write(bytes);
    } finally {
      if (os != null) os.close();
    }
  }
  private static void makeDirectory(String dirPath) {
    File dir = new File(dirPath);
    if (!dir.exists()) {
      dir.mkdir();
    }
  }
}This usually means the image was not uploaded to the server successfully. Work through the checks below in order.
Check 1. Verify the image URL returns a 200 OK response
Open your browser's Developer Tools, go to the Network tab, and confirm the image request returns a 200 OK status code.
Check 2. If the status is not 200 OK, verify the file exists on the server
shell> cd [installation directory]
shell> cd webapp/w2/editor/uploads/images/
shell> ls -al
9f7b27a9ab459f6f4e7cd0baadce4d3bba5d4930.jpg
Check 3. If the file is present, verify your integration source code
Confirm the URL path is being set correctly in the response map:
Map<String, Object> map = new HashMap<String, Object>();
// Pass a browser-accessible path via uploadPath.
// Adjust this to match your image upload directory.
String uploadFile = "9f7b27a9ab459f6f4e7cd0baadce4d3bba5d4930.jpg";
map.put("uploadPath", "webapp/w2/editor/uploads/images/" + uploadFile);