릴리즈 2.2.0 이상
1. Installation
Synap Editor installation package is comprised of the following components.
- Synap Editor + Import Module
- SynapEditor_2.x.x.zip
- Forts for metafile conversion
- fonts.zip
Copy the installation file to the desired path and decompress the zip file.
*In this example, we copy the file in the /workspace path and decompress the zip file. It will also be explained in case / workspace is located in WEB ROOT.
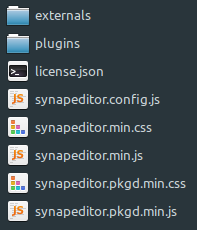
When you decompress the SynapEditor_2.x.x.zip file, the following path is generated.
| Path | Content | Explanation |
|---|---|---|
/workspace/SynapEditor_2.x.x/SynapEditor |
| externals : external module directory plugins : plugin directory license.json : license file synapeditor.config.js : configuration file synapeditor.min.css, synapedtiro.min.js : Synap Editor synapeditor.pkgd.min.css, synapeditor.pkgd.min.js : Synap Editor including external modules and plugins |
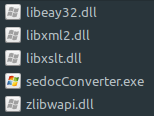
| /workspace/SynapEditor_2.x.x/sedocConverter | Windows
Linux
| Import module (execution file) Windows : sedocConverter.exe, all kinds of dll Linux : sedocConverter_exe |
Decompress fonts.zip under /workspace.
| Path | Explanation |
|---|---|
/workspace/fonts | Font file for converting metafile (wmf/emf) when the document is imported |
2. Configuration
2.1 Set the License
Open the synapeditor.config.js file and choose the path for license.json file. The license.json file path should be accessible via a browser.
{
   /**
     * Set up the path or object for license file
     * ex) '/synapeditor/license.json'
     * ex)  {
                'company': 'SynapSoft',
                'key': [
                    'licenseKey'
                ]
            }
     */
    'editor.license': 'synapeditor/license.json',
  ...
}
3. Initializing Synap Editor and edited content saving
Incorporating Synap Editor into your own environment is also very simple and straightforward.
You can choose either <div> or <textarea> tag for the instantiation of Synap Editor.
3.1 Using <div> tag
3.1.1 Include script and css file for Synap Editor with <script> and <link> tags
<link href='synapeditor/synapeditor.min.css' rel='stylesheet' type='text/css'>
<script src='synapeditor/synapeditor.config.js'></script>
<script src='synapeditor/synapeditor.min.js'></script>
3.1.2 Create new Synap Editor instance using <div> tag
<!DOCTYPE html>
<html lang="ko">

<head>
<meta charset="utf-8">
<meta http-equiv="X-UA-Compatible" content="IE=edge">
<meta name="viewport" content="width=device-width, initial-scale=1.0, minimum-scale=1.0, maximum-scale=1.0, user-scalable=no, shrink-to-fit=no">
<title>Synap Editor | Unlimited Rich Text Editor</title>

<link href="synapeditor/synapeditor.min.css" rel="stylesheet" type="text/css">
<script src="synapeditor/synapeditor.config.js"></script>
<script src="synapeditor/synapeditor.min.js"></script>
<script>
function initEditor() {
	var se = new SynapEditor("synapEditor", synapEditorConfig);
}
</script>
<body onload="initEditor();">
	<div id="synapEditor"></div>
</body>
</html>
3.1.3 Save edited content by POSTing HTML form
This example uses jQuery to send POST request.
<!DOCTYPE html>
<html lang="ko">

<head>
<meta charset="utf-8">
<meta http-equiv="X-UA-Compatible" content="IE=edge">
<meta name="viewport" content="width=device-width, initial-scale=1.0, minimum-scale=1.0, maximum-scale=1.0, user-scalable=no, shrink-to-fit=no">
<title>Synap Editor | Unlimited Rich Text Editor</title>
<link href="synapeditor/synapeditor.min.css" rel="stylesheet" type="text/css">
<script src="https://code.jquery.com/jquery-3.3.1.js"></script>
<script src="synapeditor/synapeditor.config.js"></script>
<script src="synapeditor/synapeditor.min.js"></script>
<script>
$(document).ready(function() {
	var se = new SynapEditor("synapEditor", synapEditorConfig);

	$('#seform').on('submit', function() {
		$('#editor').val( se.getPublishingHtml() );
		return true;
	});
});

</script>
<body>
	<div id="synapEditor"></div>
	<form id="seform" name="seform" action="/save" method="post">
		<textarea id="editor" style="display:none"></textarea>
		<input type="submit" value="SAVE"/>
	</form>
</body>
</html>
3.2 Using <textarea> tag
3.2.1 Include script and css file for Synap Editor with <script> and <link> tags
<link href='synapeditor/synapeditor.min.css' rel='stylesheet' type='text/css'>
<script src='synapeditor/synapeditor.config.js'></script>
<script src='synapeditor/synapeditor.min.js'></script>
3.2.2 Create new Synap Editor instance using <textarea> tag
<!DOCTYPE html>
<html lang="ko">

<head>
<meta charset="utf-8">
<meta http-equiv="X-UA-Compatible" content="IE=edge">
<meta name="viewport" content="width=device-width, initial-scale=1.0, minimum-scale=1.0, maximum-scale=1.0, user-scalable=no, shrink-to-fit=no">
<title>Synap Editor | Unlimited Rich Text Editor</title>

<link href="synapeditor/synapeditor.min.css" rel="stylesheet" type="text/css">
<script src="synapeditor/synapeditor.config.js"></script>
<script src="synapeditor/synapeditor.min.js"></script>
<script>
function initEditor() {
	var se = new SynapEditor("synapEditor", synapEditorConfig);
}
</script>
<body onload="initEditor();">
	<textarea id="synapEditor"></textarea>
</body>
</html>
3.2.3 Save edited content by POSTing HTML form
This example uses jQuery to send POST request.
<!DOCTYPE html>
<html lang="ko">

<head>
<meta charset="utf-8">
<meta http-equiv="X-UA-Compatible" content="IE=edge">
<meta name="viewport" content="width=device-width, initial-scale=1.0, minimum-scale=1.0, maximum-scale=1.0, user-scalable=no, shrink-to-fit=no">
<title>Synap Editor | Unlimited Rich Text Editor</title>
<link href="synapeditor/synapeditor.min.css" rel="stylesheet" type="text/css">
<script src="https://code.jquery.com/jquery-3.3.1.js"></script>
<script src="synapeditor/synapeditor.config.js"></script>
<script src="synapeditor/synapeditor.min.js"></script>
<script>
$(document).ready(function() {
	var se = new SynapEditor("synapEditor", synapEditorConfig);
});
</script>
<body>
	<form id="seform" name="seform" action="/save" method="post">
		<textarea id="synapEditor"></textarea>
		<input type="submit" value="SAVE"/>
	</form>
</body>
</html>
4. Set plugins and external module
You can add the various plugins of Synap Editor as below.
Please refer to plugin page for more detailed information.
Apply External Module
Apply external module like Code Mirror etc. to get more powerful editing features.
Please refer to external page for more detailed information.
Example of applying plugin and external module
<!DOCTYPE html>
<html lang="ko">

<head>
<meta charset="utf-8">
<meta http-equiv="X-UA-Compatible" content="IE=edge">
<meta name="viewport" content="width=device-width, initial-scale=1.0, minimum-scale=1.0, maximum-scale=1.0, user-scalable=no, shrink-to-fit=no">
<title>Synap Editor | Unlimited Rich Text Editor</title>

<!-- Synap Editor -->
<link href="synapeditor/synapeditor.min.css" rel="stylesheet" type="text/css">
<script src="synapeditor/synapeditor.config.js"></script>
<script src="synapeditor/synapeditor.min.js"></script>


<!-- Synap Editor Plugins -->
<!-- Personal Data Protection -->
<script src="synapeditor/plugins/personalDataProtection/personalDataProtection.min.js"></script>
<link rel="stylesheet" href="synapeditor/plugins/personalDataProtection/personalDataProtection.min.css">
<!-- Special Character/Emoji -->
<script src="synapeditor/plugins/characterPicker/characterPicker.min.js"></script>
<link rel="stylesheet" href="synapeditor/plugins/characterPicker/characterPicker.min.css">
<!-- Photo Editor -->
<script src="synapeditor/plugins/tuiImageEditor/tuiImageEditor.min.js"></script>
<link rel="stylesheet" href="synapeditor/plugins/tuiImageEditor/tuiImageEditor.min.css">
<!-- Web Accessibility Checker -->
<script src="synapeditor/plugins/webAccessibilityChecker/webAccessibilityChecker.min.min.js"></script>
<link rel="stylesheet" href="synapeditor/plugins/webAccessibilityChecker/webAccessibilityChecker.min.min.css">

<!-- Synap Editor Externals -->
<script type="text/javascript" src="synapeditor/externals/formulaParser/formula-parser.min.js"></script>
<script type="text/javascript" src="synapeditor/externals/codeMirror/codemirror.min.js"></script>
<script type="text/javascript" src="synapeditor/externals/codeMirror/xml.min.js"></script>
<link rel="stylesheet" href="synapeditor/externals/codeMirror/codemirror.min.css">

<script>
function initEditor() {
	var se = new SynapEditor("synapEditor", synapEditorConfig);
}
</script>
<body onload="initEditor();">
	<div id="synapEditor"></div>
</body>
</html>
{
'editor.toolbar': [
    //...,
    'personalDataProtection',
    'specialCharacter', 'emoji',
    'tuiImageEditor',
    'WebAccessibilityChecker',
    //...
],
}
4. Set Import and upload API
Register the import and upload API path to the configuration file for file(image, video, ...) upload and document file(doc, docx, xls, xlsx) import.
APIs(/importDoc, /uploadImage, /uploadVideo, /uploadFIle) required Import and upload should be implemented in Back-end. Please refer to server connection manual.
{
    'editor.import.api': '/importDoc',
    'editor.upload.image.api': '/uploadImage',
    'editor.upload.video.api': '/uploadVideo',
    'editor.upload.file.api': '/uploadFile',
   ...
}
Please refer to Configuration page for more detailed information regarding other setting up regarding other menu and toolbar etc.